Guide to Getting the Best Performance Out of Your Oculus Link
While the Oculus Link cable connection is already out of the Beta, you still need to perform the right setup and tweaking to get the best performance out of it. Here are some tips on how you can make the most of your Oculus Link connection.
Use USB 3.0
While you can use Oculus Link with USB 2.0, you will only be able to work with a refresh rate of 72Hz. If you try increasing the bitrate with a USB 2,0 cable, you will get a stuttering performance. USB 2.0 also has higher levels of latency.
By using a USB 3.0 cable, you will be able to unlock both the 80Hz and 90Hz modes that enable you to improve your bitrate and minimize the compression artifacts. The smoothness with which the ESB 3.0 works also depends on the specific cable and your motherboard.
Facebook sells its official 5m USB 3.0 cable for $79. This cable is fiber optic and is therefore thin and light. However, you can also purchase cheaper third-party alternatives from retail websites like Amazon.
You can determine if you are in the USB mode by opening the Devices tab of the Oculus PC app and then clicking on your headset. If you are in this mode, you should see a green tick mark.
However, if it is only showing up as USB 2, then you should try out every USB 3.0 port on your PC. Alternatively, you can try rebooting the PC and the Virtual Reality headset. If there is a USB-C port on your graphics card, then try it out. If all of these steps do not work, then you can buy and install a PCI-E USB card.
You Can Get Best Performance with the Recent NVIDIA Cards
For normal PC gaming applications, the choice between AMD and NVIDIA is often simply a question of looking at both the price and raw performance. This is particularly the case for native PC VR headsets using HDMI or DisplayPort.
The GPU won’t simply send raw frames when you are using Oculus Link cable as USB has much less bandwidth and the video stream will be compressed via video encoder in your graphics card.
NVIDIA launched a considerably improved video encoder in 2018 in its RTX 2000 Series Turing graphics cards. Its recently released RTX 3000 Ampere cards use an almost similar encoder.
The video encoders found in the older NVIDIA cards as well as in some new AMD cards such as the RX 5000 series produce a noticeably poor image quality along with a higher latency.
For good performance, always ensure that your drivers are up to date irrespective of the graphics cards that you are using.
It isn’t easy to hit 90Hz
A 90Hz refresh rate is the aspiration of any avid user as it leads to greater realism in the virtual experience. However, in real-world applications, such framerates may be difficult to attain.
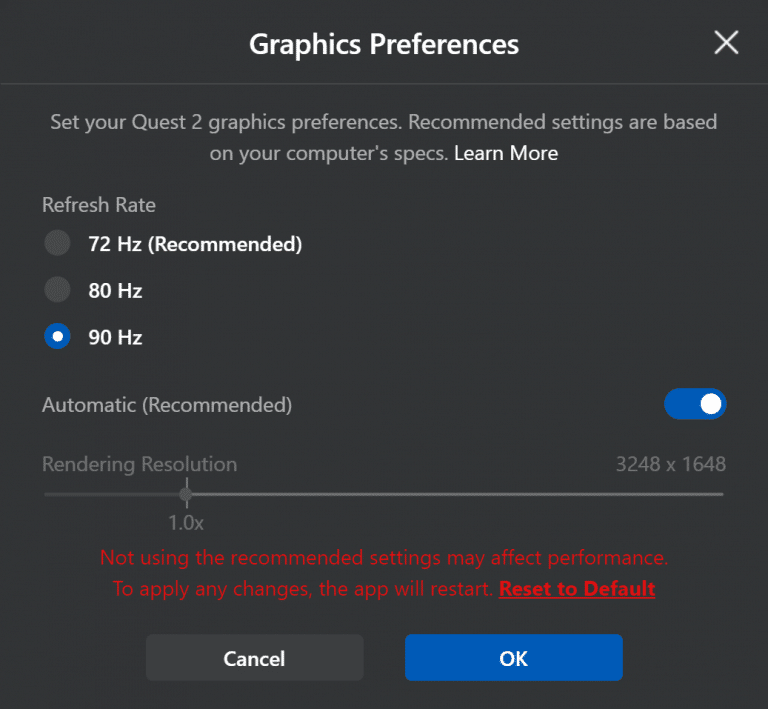
By default, the Oculus Link connection runs at 72Hz but in the USB 3.0 mode on Quest 2, you can take this to as high as 80Hz or 90Hz.

Having a high refresh rate minimizes the latency and enables smoother controller tracking making the virtual worlds to appear more solid while also reducing eye strain and VR motion sickness. However, a refresh rate of 90Hz is a lot more difficult for your typical PC to render.
If you are running 90Hz framerate and some game still stutters even after you have lowered the graphics settings, then consider lowering the refresh rate. However, for the best performance, try as much as possible to maintain it at 90Hz.
How Do You Enhance the Visuals?
You can use to main settings to boost the visual quality of Oculus Link: Encode Bitrate and Rendering Resolution.
Rendering Resolution
The Rendering Resolution refers to the resolution at which your PC renders the virtual content. It is limited by the specifications of the PC such as the RAM, CPU, GPU along with other performance-based specifications.

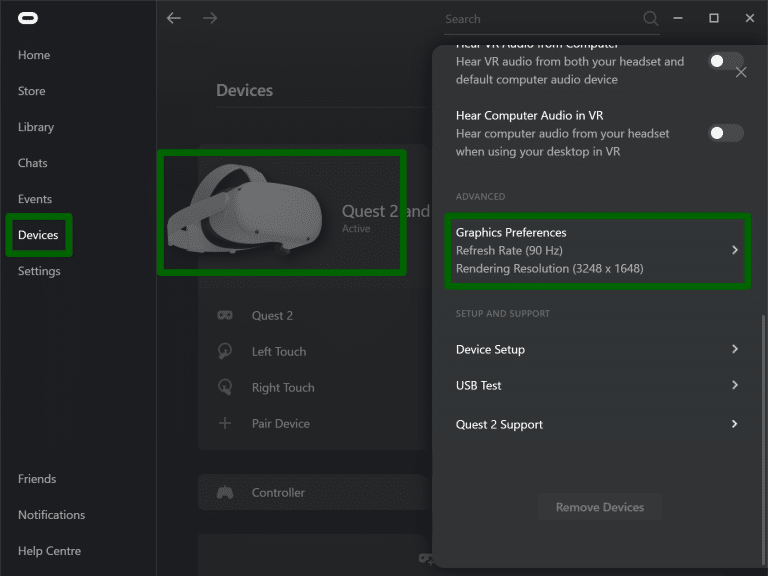
The Rendering Resolution can be set in the same panel where you find the Refresh Rate. App-click Quest 2 and Touch in the Devices tab and you will find. Facebook recommends that you set it at Automatic.
Encode Bitrate
The Oculus Link connection will compress image to make them work in US which degrades the visual quality of the images and also affects the bitrate of a video stream.
However, the bitrate can be set manually using the Oculus Debug Tool (ODT). You can access this in the oculus-diagnostics subfolder which is found in the Support folder of the Oculus software directory.

This is accessible in the C:\Program Files\Oculus\Support\oculus-diagnostics by default.
If you set the ODT value to 0, this will be the default although the software doesn’t show what the default is.
The third key Oculus Link visual quality setting was Encode Resolution Width but this is now automatically set depending on your rendering resolution following the v23 update so you should leave this as 0 (default).
The Bitrate Factor
While the default bitrate isn’t clear at the moment, the consulting CTO John Carmack had revealed it as “about 150 Mbps” in May of this year.
An increase in the bitrate leads to a corresponding increase in the visual quality while also lowering the number of compression artifacts. However, it also leads to higher latency which can cause stuttering if the headset or the GPU is unable to keep up with the bitrate.
According to Facebook engineers, users experience diminishing returns after 250 Mbps. While the maximum bitrate is 500 Mbps, it is not recommended to go past 250 Mbps.
In the future, Facebook is planning to have Encode Bitrate automatically set.
https://virtualrealitytimes.com/2020/12/18/guide-to-getting-the-best-performance-out-of-your-oculus-link/https://virtualrealitytimes.com/wp-content/uploads/2020/02/Official-Oculus-Link-Cord-560x640.jpghttps://virtualrealitytimes.com/wp-content/uploads/2020/02/Official-Oculus-Link-Cord-150x90.jpgTechnologyWhile the Oculus Link cable connection is already out of the Beta, you still need to perform the right setup and tweaking to get the best performance out of it. Here are some tips on how you can make the most of your Oculus Link connection. Use USB 3.0 While you...Sam OchanjiSam Ochanji[email protected]EditorVirtual Reality Times - Metaverse & VR
